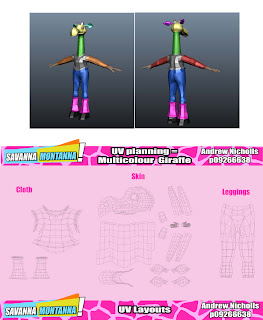
So what have done since the last post. Well i marked all the sections of my model out so i know what my uv are going to be and seeing which type of mapping will be best. Such as planar, cylindrical and the axis they need to be on.
I wanted to have cylindrical mapping on the arm as that would be logical but for some reason cylindrical only works on the y axis. So i could use it on the neck but not the arms. It's rather silly anyway i ended up cutting the arms in two places front and back. Some parts like the top i didn't cut up into chunks and really it was about just separating that part of the mesh from the other. And when thinking about the head i was cheeky in that i just selected all the faces for the head and just did a planar map on the X axis so the UV is looking from the side. I didn't split the face up. It does mean what i do on one side will be the same on the other side, but for this character i'm ok with that. Also projecting from the side would be easier for a character like a giraffe which has a long head that if you did a human head which you would do form the front. The side view would allow me to add the giraffe pattern better on the face and around the eyes.

The Use of several UV Maps.
In mind this was a more straight forward task that what it ended up being. You see how i've been UVing in Maya is that all your cut outs UV in the UV editor are essentially on the same bit of paper. But this would mean all the parts would share the same shader quality such as transparency, reflection etc. Which I didn't want. The skin has a different texture quality to the shirt and the shirt different to the leggings. So there was two ways i could go down with this in my mind.
1) A different UV map for each section Skin, Cloth and leggings.
2) Use grey scale maps on each of the texture attributes that would determine how much each attribute would be effected.
Several uv maps seemed the most logical. Now i've done this several times now in Cararra have a different maps so i was ok with the logic. But in maya things are a little more complicated when it comes to texturing and connections need to be made. So after scratching my head and figuring out how to separate the uv into several maps it was then just a matter of applying the textures maps to the mesh...right? Wrong while the maps where all separated it turns out you need to create a relationship with the shader and the map. So que very useful tutorial:
http://www.3dtotal.com/index_tutorial_detailed.php?id=195&catDisplay=1&roPos=1&page=2#.T1s2n_WApAN
Which solved the issue and normal service continued. Now there is a few tweaks needed on the textures and then it should be done.
what about the sets? That's a good question for now i'm leaving them and putting all effort into the character so i can animate. Sets will then be made once for the "first pass" of animation is complete. So they haven't been forgotten but sidelined for now.
oh p.s in the top image i say sponsored by the watering hole dance studios. This is a fictional dance studio i made up for young talented performing animals.
